(03) 9402 6483
Call us today!
My Account
Manage orders
Call us today!
Manage orders
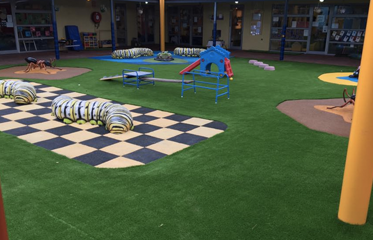
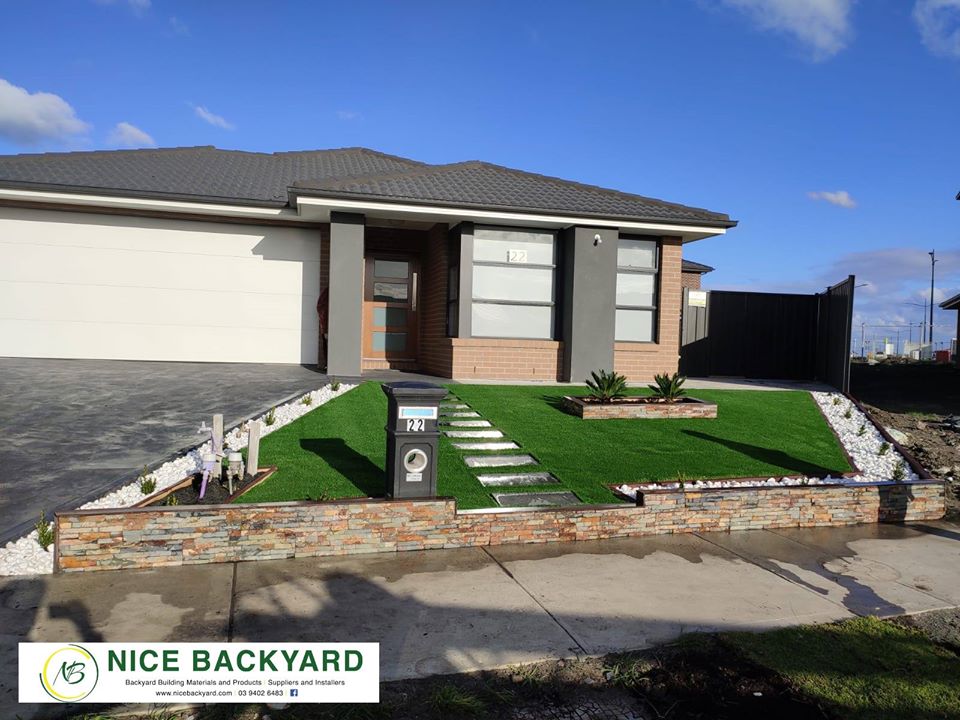
Installing Artificial Grass may just be the perfect way to give your tired looking garden a facelift. Old worn looking garden can easily be transformed into lush green grass that’s perfect for entertaining your friends and family, and for the kids to play on all year round – and of course, it’s a pet friendly too. As for parents who wants to see their children play around onto their garden, their safety is the main priority that’s why parents try and install Shock Pads underlay to their Artificial Grass because of its obvious benefit of being soft and springy underfoot which is perfect for kids playing around. Considering in installing Shock Pads underneath an artificial grass, it is extremely important to choose a good quality foam. Try to avoid recycled foams as they tend to absorb moisture, causing them to expand and contract. The smell of the dog/cat urine can become trapped in the foam making the odor very difficult to remove. Therefore, always ensure to choose a foam underlay that has a built-in draining holes that allow liquids to run through freely, without being absorbed.
Providing safety measures should an accident happen, that’s why shock pads are ideal for areas like playgrounds and schools or where any play equipment is installed. Shock Pads comes in 25mm thickness, comes in sheets of 1.1 x 1.5m and allows for a Critical Fall Height of 1.4m. if required it can also be doubled-up to create a 50mm Shock Pad to allow for up to a 2m Critical Fall Height.
Here are the steps on How to Install Shock Pad under Synthetic Grass:
Step 1 –
Remove existing earth, dirt and sand down to the required depth. This includes removing the existing grass area, its root base and a section of soil underneath. This is reduced to a specific depth to enable to install all the layers required to construct the high quality, fully porous fake grass system.
Step 2 –
Apply and fit the weed barrier on the exposed soil base. This is placed to prevent the growth of weeds and sinking of the aggregate across the whole base of the artificial lawn.
Step 3 –
Construct an aggregate base across the whole area where the artificial grass lawn is to be fitted. Then compacts the area using a compactor equipment.
Step 4 –
Level the base lawn area. Use a specific material including a screed bar to ensure a perfect level across the lawn area. This provides a strong, durable and professionally levelled base for precise installation of an artificial grass lawn.
Step 5 –
Shock-pad base fit. Fit the shock pad base on top of the aggregate base. Roll out the first piece of foam and cut to the required shape. You will find it easiest to cut all the foam and lay it in into position before you begin to glue anything. (TIP: As the foam comes on a roll, it will naturally try to roll itself back up soon as you let go of it. To stop this from happening, place a heavy object on each end to hold it in position.) Secure all the pieces of foam together, using a masking tape. Once the foam has been cut to shape and taped up, you can begin the gluing process. Depending on the temperature, you usually get around 30 minutes to work with the glue, so you’ll need to work reasonably quickly.
Step 6 –
Supply and fit the chosen artificial grass. Roll out the first piece of artificial grass, ensuring it covers the foam. Cut it into sizes. Take good care when cutting as you only get one chance to get it right. If you have joints, you’ll need to trim three stiches off the edge of each piece of grass, to form an invisible join. As with a normal artificial grass installation, you’ll need to glue the joints together. The easiest way to complete this step is to just glue the joints at this stage and then leave the glue to go off, before gluing the perimeter.
Step 7 –
Apply strong, durable quality glue to all the edges. Now that any joints have been secured, you’ll be able to fold back the grass at the edges (without the joints coming apart) and apply a layer of glue to the entire lawn perimeter. Use the same methods that was used when securing the foam underlay. Ensure that the glue runs continuously along every part of the perimeter, without leaving any gaps. These gaps will be potential weaknesses where it may be possible to lift the grass. To ensure the grass and foam bond sufficiently, it’s advisable to stay off the grass for the next couple of hours, to prevent the fake grass from moving around underfoot.
Step 8 –
To finish, apply and mechanically brush silica sand infill to your grass. To provide exceptional stability and protection of the entire installation, a silica sand infill is applied with a special drop spreader and then mechanically brushed it. This product is an essential part of the installation process. The silica sand not only maintains the lawn, it also ensures it will remain stabilized and prevents it moving or ripping when exposed to extremely hot weather. Every artificial grass has a very slight pile direction and this step should be done by brushing into the pile, which will lift the fibers.
Now you can step back and enjoy the result ?
Please click this link to see our Shock Pad Products: https://nicebackyard.com/nice/product/10mm-shock-pads-for-use-under-turf/