(03) 9402 6483
Call us today!
My Account
Manage orders
Call us today!
Manage orders
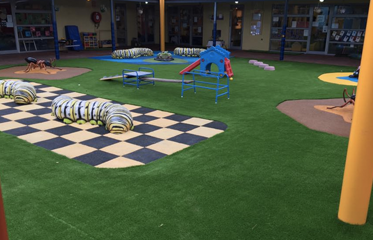
Maintaining old synthetic grass is almost too easy to do. You will save plenty of time and money by not having to mow, fertilize or heavily water your lawn to have a lush green yard. Synthetic grass cleans up is a simple, fast and effective.
The amount of maintenance required depends on a specific situation. If the landscape experiences pets/children or are surrounded by trees or live in a dusty area, your landscape might require a little cleaner effort and if the landscape does not include as much vegetation or does not experience much foot traffic, maintenance will be in a faster process.
Here are the steps how to maintain your old Synthetic Grass:
Weekly Maintenance – Most homeowners will need to lightly rinse down their artificial grass lawns once per week. Spraying down the grass fibers with a hose will remove dust and other small debris that has accumulated.
Monthly Maintenance – A more thorough synthetic grass cleaning will be done on a monthly basis will keep your lawn green, inviting and clean. Keep in mind that you may need to perform this level of maintenance more often if you have pets or during seasons when trees and shrubs lose their leaves or blooms.Once you have thoroughly cleaned your grass, you may find that it is not standing as upright as you would like and you may also notice that your grass is not erect in a certain area after you, a family member or pet has lain on it. This is easy to fix by simply grooming your lawn by using a broom or handled brush to brush against the natural grain to encourage each blade of artificial grass to stand up properly.
Remove pet waste from artificial grass – Artificial grass is safe for pets and cleaning up their solid waste is just as easy as on real grass.To remove pet droppings from grass, simply use your preferred method for removing solid pet waste. You can use a plastic bag or a pooper scooper. Once you have removed the solid waste, hose down the area in which the pet waste was located. For cleaning the pet urine on artificial grass, use a hose to spray down the area at least one time each week. And to ensure that your lawn stays clean and odor free, you may want to hose down your pet’s favorite urination area more often.
Cleaning spills, chewing gum, blood and other unfortunate occurrences from artificial grass – Artificial turf is a stained resistant, which makes cleaning up spills and other accidents easy.Most spills can simply be rinsed away with water. If residue remains after hosing off the area, you can use a mild, natural soap with warm water or a half-and-half mix of vinegar and water, which is also a great option for removing bacteria. For chewing gum, candy and other sticky substances can usually be removed just by picking them up with your hand. You can also use a plastic putty knife or similar tool for tougher removals.
Remove bacteria from synthetic grass – The bacteria buildup is generally not an issue with the artificial grass that is frequently cleaned and properly maintained. However, if you think that there is a bacterium present, you can use a half and half mix of vinegar and water to remove the bacteria. But if the area is small, such as a spot where your pet frequently urinates, you can use this mixture in a spray bottle.
Control of weeds –Grass is easy to remove when picking, brushing or raking grass. Be sure to remove weeds before you can root, especially around the edges. It is advisable to take care of a good cleaning of the lawn.You can buy several eco-friendly products at DIY centers and garden centers to kill algae, moss and weeds. If the instructions are followed, these products will not damage your artificial grass.
With proper care and maintenance, you can extend the life of your synthetic lawn and keep it looking its best for years to come. We hope that the steps above will help you maintain your Synthetic Grass.
And if you want a regular maintenance for your synthetic grass lawn, get in touch with us and we can come out and do it for you.
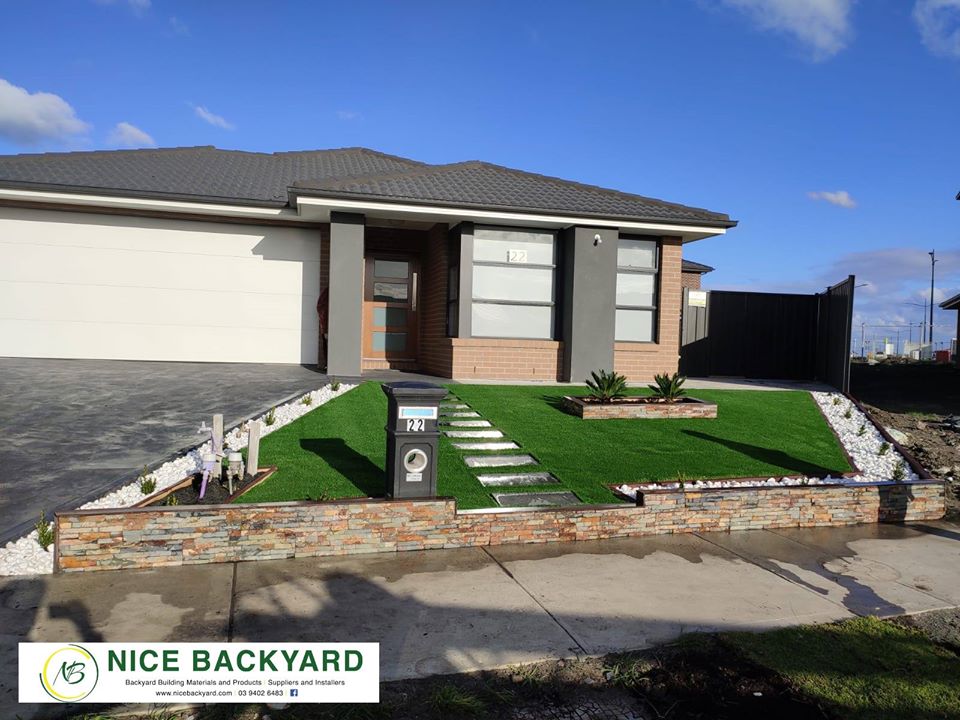
Owning Rental Properties does not have to be a headache. You can enjoy your investment properties more fully when you choose low-maintenance landscaping options that will help you save time and money each month.
The common areas or yards at your properties do not have to require high maintenance costs or become unkempt between visits if you simply opt for landscaping design that will keep your properties looking pristine while helping you save money.
Here are 6 Low-Maintenance Ideas:
A plant that is not native to the area which your rental property is located will require more water, more soil additives, and more maintenance to keep them looking their best. You can save water and lower your yard’s maintenance requirements by species that have adapted well to the local environment and seasonal changes. To find some native plants that are likely to thrive on your property, you can visit a local garden center or enlist the assistance of a local landscape designer.
The more area you cover with gravel, mulch, bark or wood chips or weed mat, the more money you can save on water and maintenance. As an added benefit, ground covers help maintain soil moisture and reduce weed growth, while taking the place of other ground covers that require more care and water, such as natural grass or low-growing plants. These low-maintenance ground covers requires some occasional raking or adding new layers to keep them looking their best.
Covered patios are the perfect place for family barbecues or evening get-togethers.Patio areas are also ideal for sunbathing or for storing equipment for water or mountain sports.Concrete walkways may be cheaper to install initially, but they tend to crack and require more maintenance over their lifetime than lower-maintenance options, like pavers.Pavers also have a far more elegant look that will immediately give your rental property an aesthetic boost that is sure to appeal to potential renters.
Water features, such as fountains or waterfalls cascading over rocks, are a lovely addition to any landscape design; however, they generally require more maintenance than you will likely want to provide for a property that is not your primary residence. A water feature that runs constantly can significantly increase your water bill, even if you choose an option that recycles the water.You will also need to consider the cost of regular cleaning, as well as pump maintenance and repair.
Decking has a great impact that will immediately give your rental property an awesome look that will be surely to appeal to potential renters. Also, when it comes to decking make sure to use a Composite Decking as you don’t have to stain it every year which helps you save more.
Opting for synthetic grass over natural grass is one of the top money-saving choices you can make when designing your landscape.Fake grass requires minimal maintenance that can easily be accomplished on your own or that can be outsourced to a local landscaping company that specializes in caring for artificial turf.With just a little cleaning and an occasional brushing, your synthetic grass lawn will always be ready for your family to enjoy as soon as you arrive at your vacation home.
With all the tips we have shared, we hope that it helped you about Landscaping your Rental Property.
If you need a quote for some low maintenance works done at your property, it’s time to call Nice Backyard on 03 9402 6483 or visit www.nicebackyard.com. If you plan to do it on your own and save some more, please don’t worry we just love to guide you through your project.
Most of the people when they are choosing the right artificial grass they want to know more if which type of grass is better. Other’s may have to inquire outside of the country thinking that its better compared to local artificial grass. That’s the time that they have questions if the artificial grasses outside the country (CHINA) is better compared to the local artificial grass (AUSTRALIA). All the artificial grass is made from the same materials, they were just manufactured on another country. Australia grass are made from materials imported from China. And Chinese turfs pass most of the Australian Tests, so technically Chinese turf is of good quality too. No matter where you’re buying your synthetic grass and no matter which manufacturer made it or the contractor installing it. Quality is and should be the utmost priority.
Artificial Grass was first used on 1960s in the Houston Astrodome, the first covered sports stadium in the USA. This type of artificial grass was named Astroturf, after the stadium. The objective was to create a sport playing field that was as functional as possible, functionality and not the look and feel of the turf was the key factor. Apart from being green, the playing field did not resemble natural grass in any way at all. It was made from nylon (PA = polyamide) and was in fact basically a thick layer of carpeting. Nylon had the unpleasant tendency to cause ‘burns’ when it came into skin contact. Furthermore, nylon was also a relatively costly material, which meant at that time, an artificial grass playing field represented a sizeable investment.
Polypropylene –
In the 1980s, a new type of artificial grass for sports made from polypropylene (PP) yarn with a 90% sand infill was introduced. PP was less expensive than nylon. The sand infill was used to stabilize the playing surface, or, in other words, to achieve a more natural ‘ball bounce and roll’ for tennis and hockey, and it also made the artificial grass system even cheaper.
Polyethylene –
At the end of the 1990s, the third generation of artificial grass playing surfaces was developed for field contact sports. The difference from artificial grass pitches laid the 1980s was that players could make sliding tackles without burning or grazing their skin. This was mainly due to the use of polyethylene (PE) as a raw material for the artificial grass fibers and an infill consisting of granulated rubber instead of sand, or a layered combination of both.
Some of the Australian Companies who manufacture Synthetic Grass products are exclusively made in Australia and have been designed and tested with their own unique climate and conditions in mind. Some products even qualify to carry the prestigious ‘Made in Australia’ logo. As the market for synthetic grass grows, so do the options. Some products are imported, some claim to be an Australian made but, are manufactured in Australia with imported materials. Then there are those, ‘Made in Australia’ to stringent guidelines that afford them the privilege of labelling with the ‘Made in Australia’ logo.
All in all, there are some very good quality Chinese synthetic grass and Australian synthetic grass out there, but it pays to be cautious. Nothing can irk a person more than spending a large amount of money on a product and having it deteriorate before its time. In closing, do your research and make sure to ask any questions you can regarding the quality, the warranty and the manufacturing of the synthetic grass you’re interested in buying. Be certain to check how reputable your contractor is and if he’s done jobs like your lawn. With the things that you should know about Chinese and Australian synthetic grass you can help prevent unnecessary headaches down the road.
With this information, we hope that you learn something of which turf grass is better and what are the materials used to create turf grass that was used from then and now as main tool for Landscaping ?
Do you have composite decking questions?
Read our FAQs right here:
What is it made of? Made up of wood and plastic. The wood particles can be anything from sawdust, wood chips, and wood fiber pieces. The plastic components can be either virgin or recycled plastic materials.
What is the advantage over traditional timber decking? It is long straight lengths, quick and easy to install, never warps, never rots, splinter free, no sanding, no painting, no sealing, no staining, long-lasting, scratch resistant, and bug resistant.
What maintenance is usually required? None, only occasional cleaning with a soap and water or a pressure clean.
How does the cost of composite decking compare with wood? The upfront cost of this decking is more than that of pressure treated wood. However, that is offset by a useful life that’s significantly longer. Buying wood means you will have to incur the cost of replacement sooner. In addition, the maintenance costs of wood are greater because composite decking requires less maintenance. You can take advantage of certain brands that sell lower cost composites. They typically offer a more limited choice of colors, textures, and designs which still retain the main benefits of composites.
Does composite decking get hot in the sun? This depends on the color and material. Dark colored decking made of heavy and dense composite material will absorb a lot of heat and make it hot in the summer. Lighter colored and less dense materials do much better in the summer heat. Look for composite decking specifically made for staying cool in the sun.
Will my composite deck look like plastic? The pricier composite decking comes in a variety of natural wood colors with dense and rich looking grain patterns.
Does composite decking require special tools for installation? No. Composite decking requires no specialized tools beyond what you would use with wood.
How long will the antimicrobial product protection last? Antimicrobial protection is built-in during the manufacturing process and will not wash off or wear away. It is engineered to provide continuous antimicrobial product protection for the useful lifetime of the product.
How is it fixed? Each board is pre-grooved on both sides to take a hidden fastener system.
How does temperature affect my composite deck boards? Composite deck boards are suitable for all climates and are sold all over the world where harsh freezing winters and boiling hot summers have put them to the test.
Are they slippery when wet? No. Composite decks are wet resistant.
Can you DIY? Yes, it is a DIY Friendly.
At Nice Backyard we stock Composite Decking and Fascia, please give us a call to enquire about our range of decking products.
Wood or Composite Decking, like any major home purchase, decking materials vary in looks, durability and cost. You might want to use certain types of lumber or decking for structural parts of your deck project, and other decking timber for surfaces and railings, the part on which you will walk on and see.
A deck can last anywhere from 10 to 30 years if made from untreated wood and can last up to 50 years for treated wood or composite materials. Because a deck is a long-term investment and you will be enjoying it too for decades to come, it’s important to understand your choice of materials before start building your project. Both wood and composite materials come in low and high quality, so cost or quality is not the only factor. It’s commonly known that composite materials require less maintenance, hence, their cost is usually higher. But they do require some maintenance, and other factors come into play too.
Here are the Differences between Composite and Hardwood Decks:
Wood Decks
Composite Decks
Deck Maintenance
With the information above, we hoped that it helped you which of those two decks should you choose as for your Decking Material. At Nice Backyard We stock Composite Decking, Please feel free to call us for any other questions.?
The classic wood deck is a quintessential addition to any residential home. A well-built, spacious deck is not only the perfect spot for outdoor entertaining, but it also adds value to your home in the event you decide to sell.Wood might overall be a more valuable material than composites, vinyl and other decking alternatives, but careful consideration should be paid to the type of wood you choose. The wood material you end up with will have a significant effect on care needs, longevity and overall lifecycle costs.
Decking options have grown accumulatively over the past several years. It wasn’t long ago that only choice was wood which came in perhaps 2 or 3 species. However, thanks to an explosion of composite lumber, and hardwood imports, there’s now dizzying array of decking available.Whether you’re breaking ground this summer or still sketching out the blueprints, it pays to know your options.
Here are the different types of Decks that you might need to know:
We hope that the above information helped you know more about which decking material is good for your home. And if you are a fan or Composite Decking no need to look for it as we at Nice Backyard, supply
If you’re a home owner, landscaping might consume a significant portion of your budget during the spring and summer months. It is not necessarily one of those expenses that people think about very often either. Many people overlook this expense entirely when they are creating their monthly and annual budget.
It’s easy to buy too much lawn fertilizer, over water, over treat with chemicals and over purchase expensive plants that look super in the store but begin dying of neglect shortly after arriving home. So maybe it’s time to save a little money and a little stress by using a few simple tips that will keep your yard green and save you some green at the same time.
Here are some tips that you might need to know:
With the information above, we hope that it helped you get some tips to avoid spending too much on maintaining your lawn. This way you can save more and less on expenses for your lawn ?
There different ways to spice up the concrete but coloring it is the most convenient and less expensive compare to others. Concrete can be colored in four different ways: you can stain, integral pigments, color hardeners and dyes. Each of these coloring methods produces different looks and comes with their own set of advantages and disadvantages. Coloring concrete is getting popular too nowadays resulting to many household owners want to experience colorful lawn that’s why most of them tried and did coloring concrete with their choice of color.
Here are a few tips on Coloring your Concrete and getting the best results with color:
Think in terms of what effect you want to achieve, rather than a specific product: Each of the coloring mediums can produce dramatically different results. First you need to decide what look you’re after like as earthy tones vs. bright primary colors and uniformity vs. marbling or antiquing effects and then work with your decorative concrete contractor to determine the best product or combination of products for your design needs.
Don’t rely on color charts alone: The color charts or cards provided by the color supplier may not precisely represent what the results will be on your project. With the integral pigments, the final color will vary depending on the cement color, sand color and the amount of water that is used in the mix. With surface-applied treatments, especially reactive chemical stains, the color can vary widely depending on the condition and original color of the base concrete. Always conduct a trial application of any color treatment you plan to use.
Consistency counts: For new concrete, its important for every batch of concrete used on the project to be consistent, including cement type and brand, aggregates and water-cement radio. When different batches of concrete vary slightly on the same job, they may absorb stain or dye differently but resulting in noticeable color variations. Inconsistencies in finishing practices, timing of operations and curing and sealing methods can also result in slight color variations.
Consider custom color matching: If you can’t find the right color for your project, ask the color manufacturer or your decorative concrete contractor if it’s possible to have a custom color matching. Many color suppliers can match existing color tones or formulate custom hues to suit your design scheme. With most stains, its possible for the applicator to achieve the custom shades by mixing two or more colors by applying one color over another. Most dyes also allow flexibility in the end color because they are packaged in concentrated form and can be diluted or blended to produce custom hues.
We do hope that with the information above it helped you to know more about Coloring your Concrete.
At NICE BACKYARD, we do stock concrete sealers, just give us a call and we’ll be happy to assist you ?
Having a Deck helps improve your place to look classier and more fascinating. It’s the perfect place too to entertain friends and family during special occasions or even just a simple get together that’s why its very important to make sure that it always looks great. There’s nothing like giving your deck a through clean to bring it back to life and with the right maintenance steps it will be a pretty simple job.
Once your beautiful deck is installed, you will need to clean and maintain it to keep it looking at its best for more years to come. This will help you eliminate mildew and help you spot any problems over time and to protect your deck too. Here are some things that you need to know to clean and maintain your decks:
Merbau Decking
Step 1: Sweep away the dirt and the leaves
Step 2: Use a high-pressure cleaner / Power wash
Step 3: Use a cleaner and mix it with water
Step 4: Scrub the Deck
Step 5: Wash it a high-pressure clean
Step 6: You can now enjoy your clean deck
Composite Decking
Step 1: Find an appropriate Deck Cleaner
Step 2: Remove Debris
Step 3: Power Wash your Deck
Step 4: Apply Cleaner
Step 5: Spot Clean and Repair
Your deck is a beautiful addition to your home, providing you and your family with a space to grill and just hang out. We hope that with the steps above helped you maintained your composite and merbau deck to last long and keep it looking great ?
When installing Artificial Grass, the secret to its longevity is establishing a solid sub-base. This can involve a lot of work. However, with concrete, you may already have an excellent sub-base ready to install the artificial grass on to. This has two very important benefits: Firstly, the back-breaking groundworks are already complete (the most physical aspect of installing artificial grass is the groundworks stage). Typically, with a standard artificial grass installation, the existing grass must remove either by hand or by using a turf cutter. And secondly, not only will it save you work, but it’s also going to help you financially as well. Therefore, one of the major advantages of installing artificial grass on concrete is that its’s relatively quick and inexpensive to do.
We at Nice Backyard always advice using a professional to install artificial grass as sour experience will result in a better finish. However, it is reasonably quick and easy to install artificial grass on concrete and if you have some DIY ability, you should be able to carry out an installation yourself.
Here are our steps to help you along the way:
Prepare first the tools and materials that will be needed such as Stiff Broom, Garden Hose, Stanley Knife (along with lots of sharp blades), Filling knife or stripping knife (to spread artificial grass adhesive), Artificial Grass, Foam Underlay, Artificial Grass Glue and Joining Tape.
Step 1 – Clean Existing Concrete
You’ll need to prepare the existing concrete. In most cases a foam underlay will be all that’s needed to go under your grass. Before this is installed, we strongly recommend to thoroughly clean the concrete, so the artificial grass adhesive will properly bond with the concrete. It’s also a good idea to remove moss and weeds. If weeds are a problem with your existing concrete, we recommend applying a weed killer. Your concrete can be hosed and/or brushed with a stiff broom too. Once it’s clean, you’ll need to allow the concrete to completely dry before moving on to the next step.
Step 2 – Install Drainage Holes If Required
To assess how well water drains off it, cleaning your concrete or paving is also a good opportunity. If the water disappears without puddling, you can move onto the next step, if it doesn’t, you’ll need to drill drainage holes where the puddles form. This will ensure you won’t have standing water after a downpour.
Step 3 – Install Artificial Grass Foam Underlay
Once your concrete or paving has thoroughly dried, starting at one end of the concrete, and ensuring the foam goes right up to the edge, roll out the first piece of foam and cut to the required shape. You’ll find it easiest to cut all the foam and lay it into position before you begin to glue anything. Secure all the pieces of foam together, using masking tape. Once the foam has been cut to shape and taped up, you can begin the gluing process. Using a filling knife or stripping knife, apply the adhesive to the concrete or paving and if water will be draining off your concrete or paving, rather than through drainage holes, you’ll want to leave gaps in your gluing to allow water to escape. It’s very important that the concrete is completely dry when you do this, to ensure the adhesive bonds properly.
Step 4 – Cut Grass to Size and Prepare Joints
Roll out the first piece of artificial grass, ensuring it covers the foam. If you have joints, you’ll need to trim three stiches off the edge of each piece of grass, to form an invisible join. Remember, do all your cutting before you attempt to glue anything. Don’t attempt to glue the joints down directly to the foam, as each piece will move independently when you walk over the new lawn and this will make the joints visible and the easiest way to complete this step is to just glue the joints at this stage and then leave the glue to go off, before gluing the perimeter.
Step 5 – Secure the Perimeter with
Now that any joints have been secured, you’ll be able to fold back the grass at the edges and apply a layer of glue to the entire lawn perimeter. Ensure that the glue runs continuously along every part of the perimeter, without leaving any gaps. These gaps will be potential weaknesses where it may be possible to lift the grass. To ensure the grass and foam bond sufficiently, it’s advisable to stay off the grass for the next couple of hours, to prevent the fake grass from moving around underfoot.
Step 6 – Add Silica Sand and Brush your Grass
To finish, we recommend adding a sand infill this will help dissipate heat and prevent the artificial fibers from becoming hot. Once the sand infill has been installed, you can then brush the grass with a stiff broom. Every artificial grass has a very slight pile direction and this step should be done by brushing into the pile, which will lift the fibers.
Now you can enjoy and admire the result of your newly Synthetic Grass lawn.
Please click this link to see our Synthetic Grass Products: https://nicebackyard.com/nice/product-category/synthetic-grass/